Tuesday, December 24, 2013

Nail Honey Swatches & Review!!

Hello all!
Sorry for my MIA-ness lately, I have been swamped with my recent surgery and Christmas.

BUT I have something exciting for you all tonight!! (:
I have, for you, three perfect, new polishes by Nail Honey. And let me tell you are they GORGEOUS! <3
And how cute are these bottles? (:

The first polish is called "Honey Mustars." It is a really pretty mustard/butterscotch yellow color; a creme polish that has red shimmer and is opaque in two coats. It was definitely a hard color for my camera to capture, but I think I got it pretty well.

Indirect artificial light (natural daylight bulbs)
It was insanely hard to capture the red shimmer when it was actually on my nails. It is seen much better in real life or in a photograph of the bottle.
Bottle shot of polish
My apologies for the not clearest of photo, but you can really see the red shimmer in the bottle. (:

The second polish is called "Little Blue Box." It is an amazing pastel blue-mint-y green shimmer.
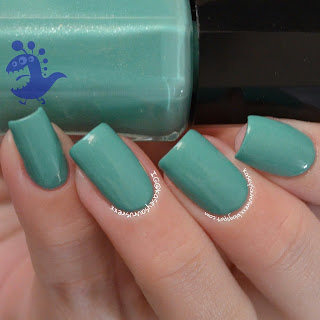
Direct artificial light (natural daylight bulbs)
This polish is also opaque in two coats. To be honest these pictures do no justice to the polishes and they are really to die for.
Macro of polish to show shimmer

Direct natural light
Indirect natural light. (not the same as the first photo, I swear!)
The shimmer is very hard to capture in photos but quite obvious in real life. Annoying!

Next, and my favorite of the three, is called "Winter Blues." This is a gorgeous frosty blue shimmer polish. Perfect formula.

Direct artificial light (natural daylight bulb)
This gorgeous polish is opaque in two coats and has a steel blue color with a shimmer that would make anyone drool a little bit.

And here is a close-up to facilitate that drooling:
It's so shimmery it's almost a holo...but not quite.

I thought it was just the right amount of cute and wintery, so I added an accent nail.

Yay for snowflakes!! If I can't have a white Christmas outside, you better bet there will be snow on my nails (;

All her polish has an excellent formula. The bottle and brush are pretty good as well. However, I do prefer flat brushes. I'm in love with all of these polishes and can't wait to see what else she comes up with!!!

Anyhow, that's it for tonight. You can find Nail Honey's shop here. Follow her on Instagram for updates and releases!!

Have a very Merry Christmas, all!
<3,
Kaseysaurusrexx

Monday, December 2, 2013

Christmas and Thanksgiving nail art!!

Hello!
I haven't posted in a while, this week is my finals week at my school and I just started training for a promotion at work, so I have been super busy!

So here is a catch-up post of some of the nail art I have done lately!
First, I decided to see how far I had come nail art wise in the past few months. I chose to recreate my first ever gradient mani, a purple/pink gradient. The top photo is the first time I tried a gradient, over 28 weeks ago, and the bottom photo is the recreation I just recently did.


I feel like I have come so far, not only in practice but in other important things like lighting, photography of the art and hand pose as well. (:
Here is the recreation by itself!
Colors used: Disturbed Potions's "Virgin? Ha!" which can be found here, OPI "Planks A Lot" and Sally Hansen XTreme Wear Fuchsia Power.

I also decided to try some Thanksgiving nails to wear for break. I used a tutorial found on YouTube for the cute little turkey, and got some inspiration from The Nailasaurus for the waterfall nails!


Mine aren't too great, but I thought the turkey was pretty adorable! Colors used are Essie "Blanc," Sally Hansen XTreme Wear "Sun Kissed" and "Disco Ball," Zoya "Darcy" and "Louise," and Sinful Colors "Ruby Ruby."

Then after going shopping and spoiling myself a bit with some Zoyas, I decided to do a mani with Maria Luisa and Jem.


I really loved the purple and gold combo and wore these for like, four days!! Jem is the deep shimmering purple and Maria Luisa is an excellent gold flakie/hex glitter topper. I absolutely love these colors!!

And last, but definitely not least, are the nails I have on! After putting up my tree and it now being December, I felt compelled to do red and green nails!! (:


Also, festive watermarks!! (: I was dying to do more gradients (as usual) and so I decided on double gradient chevron nails with red and green gradient nails as well. These kind of remind me of those peppermint flavored taffy candies they make around this time of year, and I absolutely love them!!

Colors used: Essie "Shake Your $$$ Maker," "Blanc," "First Timer," Sinful Colors "Ruby Ruby," and of course, China Glaze "Fairy Dust."

Anyway, that's all for this post! I will be able to post a bit more after the 9th, as that is my last day of finals, and (BONUS!) I have a week off from the 19th through the 26th for a few surgeries I'm having, so I will be able to do my nails a TON then, but I won't be able to do them for the surgery. No nail polish in the OR ):

On another note, I have finally decided on the photos seen here as the hand pose I like, with the little dino too (:

Have a lovely evening!!!
<3
Kaseysaurusrexx

Monday, November 18, 2013

Peel-off Basecoat Test and Holiday Nail Art

Hello lovelies!

So I had been reading everything I could on peel-off basecoats for glitter and glitter polish. I got to the point of being so sick of dealing with glitter removal; acetone soaks just dry out my cuticles like crazy.
I ended up landing on an idea appeared to work well leaving no damage whatsoever to the nail bed. White glue! For my recipe I used three parts washable white glue, such as Elmer's, and one part water, since I prefer a thinner consistency for base coats. I started by cleaning out an old Seche Vite bottle and letting it dry overnight. Then I filled the bottle 2/3 - 3/4 of the way with the glue and filled the rest with water. I shook it to mix and let it sit overnight so it wouldn't bubble.

I cut a shipping label sticker (left) to fit the bottom of the bottle to cover the SV sticker, then I found a cute sticker my sister got from PETA to doll up the bottle (right).

I wanted a Tigger sticker, but the one I had was too big and I didn't have the heart to cut it to fit ):


I then decided to test my new basecoat with the most glittery indie I own - My Ten Friends "Elsewhen."


I layered three coats of this gorgeous, glitter-laden, mermaid-esque polish over two coats of my basecoat with one coat of Seche Vite. I wore this all day to school and had no problems with unwanted peeling or chipping.
To take it off, all I had to do was push the polish at the cuticle towards the tip gently with an orange stick. Then I loosened the polish around the edges and gently pulled off the polish in single sheets.


As you can see, they came off in one piece. Also, they did no damage to my nailbeds whatsoever!! It was just like peeling craft glue off of skin or a nail.

Anyway, after finding that this basecoat works miracles and saves me time - polish removal - and skin moisture (yay!). Knowing this, I got excited and wanted to use one of my OPI Liquid Sand polishes for nail art, since I was feeling in a festive mood.

I used OPI Solitaire (3 coats) and an red mini of which I do not know the name. I did this art over a base of two coats of my glitter base and one coat of OPI nail envy over that.


Ta-Daaah! I put snowflakes over my red base with a dotting tool and Solitaire, and stripes over my white base with the red and a striping brush. I really really like these! They are getting me excited for the Colorado snow and putting up my Christmas tree. <3

Anyhow, that's all I have for you tonight. I'd definitely recommend this peel-off base recipe to anyone!!

**found the idea to use PVA glue as a basecoat here**

Have a great night!
<3
Kaseysaurusrexx

Thursday, November 14, 2013

Glitter Placement Attempt #1 + Watermarble

Hello there! (:
Tonight I have something new for you all tonight! After lurking polishallthenails's IG, I was motivated to try a glitter placement. Especially since I just picked up OPI I Snow You Love Me. (: Apologies for the bubbles, my slow-dry topcoat I use likes to bubble like crazy.


Polishes used: Essie Blanc(base for water marble), Sunday Funday, Naughty Nautical, Boom Boom Room, and First Timer. Glitter from OPI I Snow You Love Me.
I think my nails look like Fabrege Eggs, don't you?
That's all for tonight. (:
♥,
Kaseysaurusrexx


Tuesday, November 12, 2013

Mermaid Fin Watermarble inspired by Corynn Musser

Hello lovelies!
After writing three papers in one night, I figured I deserve to post on here :3

I have for you my nail art from last night. I haven't been on lately, I have three weeks left in this semester, so I've been pretty busy as you can imagine. Anyway, there is an amazing blogger and nail artist named Corynn. She is on instagram and also has a blog! She is probably the best water marbleist in the universe and she was the one who inspired me to do my first water marble at the beginning of August.

Here it is! This was my second attempt at the Mermaid Fin nails and I think they came out *alright.* But just alright. This is my right hand, and I must say, I'm only honestly happy with my ring finger and thumb (not pictured) on this hand.
I am much happier with my right hand! Excuse the nubbins on this hand, but after some practice on my left, I finally tweaked it just right for my right hand. (:
The colors I used were Essie First Timer (mint), OPI Ski Teal We Drop, Pamplona Purple, and Lincoln Park After Dark; marbled over one coat of Essie Blanc. Just add Seche Vite and that's all there is to it!

For only my third truly successful water marble, I must say I am very very very pleased with these!! (:

And here is a throwback to the first watermarble I ever did, which was only successful to countless YouTube videos and Corynn's tutorials on her blog (:


Well that is all I have for you tonight, I hope to be posting more within the next coming week as school winds down and I prepare for a few surgeries this winter.

<3,
Kaseysaurusrexx

Tuesday, November 5, 2013

Horizontal Rainbow Gradient Nail Art

Hello there!
This week has been pretty exciting - I tried a new look that I had been wanting to try for eons, and I got a ... wait for it ... CURVED WATERMARK! :D

Today I have for you a mani that I have been wanting to try since I started nail art back in May-ish.
This horizontal rainbow gradient was inspired by Darcy Sparrow (@sparrownails on IG).
This is a shot with the thumb to show the full rainbow. I absolutely adore this look! I have not yet done a skittlette mani before, so this is weird to me, having all my nails different colors.
The colors I used were Sinful Colors Ruby Ruby, Sally Hansen XTreme Wear Sun Kissed and Fuschia Power, Zoya Darcy, and Essie Shake Your $$ Maker and Bouncer, It's Me. I sponged this gradient on over Essie Blanc, and I finished off the gradient with China Glaze Fairy Dust and one coat of Seche Vite.
Here is a more normal bottle shot.

Anyway, that's all I have for tonight. Hope this inspires someone to try this as well!! (:

<3,
Kaseysaurusrexx

Thursday, October 31, 2013

Fall Watermarble Nails

Good evening!

I was feeling fall today, so I decided to go for a watermarble again to get some more practice. IN FALL COLORS YAY! (:
I apologize for my less-than-perfect water marble skills, plus this one was a bit hard to work with. As you can see I did not really get any brown on my ring finger. I used Zoya Darcy and Zoya Louise along with Sally Hansen XTreme Wear Sun Kissed. I really love fall colors so I figured, "hey, lets put them on my nails!" (:

Also I had a break today, so that's why my index is soooo short. :/

Anyway, hope you like this look!

<3,
Kaseysaurusrexx

Monday, October 28, 2013

Bubble Nail Art Inspired by Ohmygoshpolish

Hey all!

Today I have the mani I did last night to share with you. Ever since Tam (ohmygoshpolish) posted her bubble nail art on her IG, I had been dying to try it. Well, I finally did! Her method uses a polish base and watered down acrylic paints to make the bubble effect, which I must say, requires some patience. She posted a video tutorial on her YouTube that I watched before I started.
Sorry the quality is not the greatest, I was fighting with my Nikon last night so I just used my lame 8MP camera on my Galaxy S3. :p

For this I used a base of Essie Blanc and the other nails are about seven coats of Sinful Colors Gemtastic for opacity of the glitter topper. The paints I used are made by Reeves, two are acrylics (Medium Green and Blue Lake) and two are watercolors (Ultramarine and Viridian Hue). The acrylics definitely worked better; the watercolors wanted to bead up on my nail instead of go on like paint (thanks, Seche Vite!).

I am only sort of pleased with how these came out, I will definitely be trying this technique again soon! I was going for an ocean-y look.

Anyway, that's all I have for you for today. Hope you think this look is as unique as I do!! (:

Ciao for now!
Kaseysaurusrexx <3

Friday, October 25, 2013

Massive Swatch and Nail Art Catch-Up Post!

It has been a while, I apologize for not posting! I have been so busy with college and midterms. To make up for it, here are some swatches of some of my untried indies and a few manis. So HERE! WE! GO!

First up, we have a lovely polish by Breanne of The Juice Box, "Memory Lapse," which is from her Pregnancy Pains collection that she released a few months before her little juice box was born.
This lovely bright pink jelly is opaque in three coats over white and has different sized white hex and square glitters along with some white bar glitters. I love this pink, it is so girly and really great for summer during bikini weather (; The formula was really good, I didn't have to fish for the glitter and it is so smooth. All of these polishes she makes are incredible! Here is a link to her shop.

The second indie I have for you tonight is by Anette of Disturbed Potions. A polish I got a few months back, this is called, "Virgin? Ha!" and is a gorgeous raspberry colored jelly.
This jelly goes on so easily and is packed with heart glitters, purple and pink small circle holo dots and dark glitters. I did not have to fish at all for the hearts or any of the other glitters, and it reminds me of raspberry jam. (: This is three coats.

The third and final indie I have a swatch for you tonight is a lovely polish by Jo of Lacquer Lust. It is called "Sky's The Limit" and is a gorgeous baby blue that kind of looks grey but has a touch of holo in it.
This is four coats of Sky's The Limit on it's own. I found it to be a rather thin polish, so I layered on four thin coats for opacity. It reminds me of a blue pearl :D I definitely need some more of her polishes!! (:

So those are all the swatches I have for you tonight. However, I also have two manis for you!!! (:

The first is a mani I did because I finally got my hands on Sally Hansen XTreme Wear "Confetti Cake!" Yay!
I did a gradient of Essie's "Bouncer, It's Me," and OPI "Planks A Lot" topped with China Glaze "Fairy Dust." The accent nail is four coats of "Confetti Cake." I love love love love love this polish!!

The second manicure is the one I am currently wearing. I was wanting to do a watermarble and a gradient and I had just put on Essie "Shake Your $$ Maker."
 I layered a watermarble of Essie "Naughty Nautical," Sally Hansen XTreme Wear "Blue Me Away," and OPI Original Nail Envy over my green base on my ring and thumb fingers. I did a gradient of Shake Your $$ Maker, Naughty Nautical and Blue Me Away on the rest. I love how good I am getting at gradients now that I have had more practice. (:
Here is a better shot that includes my thumb. I dislike the funky hand pose but the thumb is so pretty, how could I bear to leave it out?

Well, that is all I have for you for now, maybe for a little while. School has five weeks left, so hopefully I will have more time to do nails and maybe get some swatching in.

Have a great day everyone! (:
<3, Kaseysaurusrexx

Friday, October 4, 2013

CaliforNails NailArtOct Challenge Days 1 and 4!

I am participating in my first nail art challenge ever this month! It is done by ig's CaliforNails!
This is not a daily challenge, but rather a challenge in which nail art is done every three days.
So day 1, October 1st, the prompt was gold nails. This is all I came up with.
I don't actually own any gold nail polish yet (shame on me!). For this mani I used my usual base coat of 2 coats of OPI's Nail Envy. I've been using the maintenance formula now, it's keeping my nails so strong!!
For the ring finger I just alternated coats of Nail Envy and loose gold glitter sprinkled on. The others are one coat of Sinful Colors "Whipped" with loose gold glitter sprinkled on. I used Nails Inc. Kensington Caviar Topcoat for this mani.
I was super sad to take these nails off! They were very Chanel and I felt like a supermodel wearing these (;

However it was worth it to do my manicure for the second day of the challenge, today, October 4th. The prompt was the ever-delicious candy corn!! <3
I knew I was going to do a gradient because gradients are my favorite and I so badly want to improve my gradient skills. For this mani I used Zoya "Darcy," Sally Hansen XTreme Wear "Sun Kissed," Essie "Blanc," and Sinful Colors "Whipped." I sponged on the gradients over white and two coats of Nail Envy Maintenance. I made the adorably delicious looking candy corn on my middle finger with the same yellow, orange, and white and a dotting tool. (: Topped with one coat of Seche Vite (the god of topcoats!!!)

Needless to say my cinderella hand did not come out as well. Good thing you guys don't have to see it (;

There are my manis for the 1st and 4th of the month! I will post my nails for the next prompt of the challenge on the 7th - pattern! See you then!

<3,
Kaseysaurusrexx

Thursday, September 19, 2013

Rainbow Gradient & Watermarble Nails!

Hi again!
I thought about posting my current mani because I love it so so much. So that is what I'm gonna do (:
Colors I used:
Sally Hansen XTreme Wear Blue Me Away!, Fuschia Power, and Mellow Yellow sponged on  for the gradient topped with one coat Seche Vite. I used Sally Hansen XTreme Wear White On and OPI Nail Envy for the watermarble accent.

After this photo I added China Glaze Fairy Dust because who doesn't love holo-y, glitter-y goodness?
Excuse it not being the best photo, I took this one while sitting in Art History class yesterday :3

So yeah that's it. (:

Posting again soon!!!
<3
Kaseysaurusrexx


Wednesday, September 18, 2013

kaseysaurusrexx's first post!!

Hello all!
This is my first post and I'm really excited to get this blog going. A little bit about me: I do my nails constantly, and I have an insatiable nail polish addiction. Some of you may know me from my instagram account.


So here are my first nails I'm posting on here. I did these as part of the 2nd Rainbow Collaboration on IG, hosted by Christabell and Amber. I was really excited for this collab, over 200 nail artists participated, and I was so lucky to be included!! (:


So for these nails I used Sally Hansen XTreme Wear Gunmetal, Celeb City and White On, and Mother's Milk by The Juice Box. I sponged on the gradients with tape for the chevrons and one coat of Seche Vite. I will never use another topcoat again haha (:

More to come, maybe a collage of some of my previous nail art.

<3
Kaseysaurusrexx