Monday, November 18, 2013

Peel-off Basecoat Test and Holiday Nail Art

Hello lovelies!

So I had been reading everything I could on peel-off basecoats for glitter and glitter polish. I got to the point of being so sick of dealing with glitter removal; acetone soaks just dry out my cuticles like crazy.
I ended up landing on an idea appeared to work well leaving no damage whatsoever to the nail bed. White glue! For my recipe I used three parts washable white glue, such as Elmer's, and one part water, since I prefer a thinner consistency for base coats. I started by cleaning out an old Seche Vite bottle and letting it dry overnight. Then I filled the bottle 2/3 - 3/4 of the way with the glue and filled the rest with water. I shook it to mix and let it sit overnight so it wouldn't bubble.

I cut a shipping label sticker (left) to fit the bottom of the bottle to cover the SV sticker, then I found a cute sticker my sister got from PETA to doll up the bottle (right).

I wanted a Tigger sticker, but the one I had was too big and I didn't have the heart to cut it to fit ):


I then decided to test my new basecoat with the most glittery indie I own - My Ten Friends "Elsewhen."


I layered three coats of this gorgeous, glitter-laden, mermaid-esque polish over two coats of my basecoat with one coat of Seche Vite. I wore this all day to school and had no problems with unwanted peeling or chipping.
To take it off, all I had to do was push the polish at the cuticle towards the tip gently with an orange stick. Then I loosened the polish around the edges and gently pulled off the polish in single sheets.


As you can see, they came off in one piece. Also, they did no damage to my nailbeds whatsoever!! It was just like peeling craft glue off of skin or a nail.

Anyway, after finding that this basecoat works miracles and saves me time - polish removal - and skin moisture (yay!). Knowing this, I got excited and wanted to use one of my OPI Liquid Sand polishes for nail art, since I was feeling in a festive mood.

I used OPI Solitaire (3 coats) and an red mini of which I do not know the name. I did this art over a base of two coats of my glitter base and one coat of OPI nail envy over that.


Ta-Daaah! I put snowflakes over my red base with a dotting tool and Solitaire, and stripes over my white base with the red and a striping brush. I really really like these! They are getting me excited for the Colorado snow and putting up my Christmas tree. <3

Anyhow, that's all I have for you tonight. I'd definitely recommend this peel-off base recipe to anyone!!

**found the idea to use PVA glue as a basecoat here**

Have a great night!
<3
Kaseysaurusrexx

Thursday, November 14, 2013

Glitter Placement Attempt #1 + Watermarble

Hello there! (:
Tonight I have something new for you all tonight! After lurking polishallthenails's IG, I was motivated to try a glitter placement. Especially since I just picked up OPI I Snow You Love Me. (: Apologies for the bubbles, my slow-dry topcoat I use likes to bubble like crazy.


Polishes used: Essie Blanc(base for water marble), Sunday Funday, Naughty Nautical, Boom Boom Room, and First Timer. Glitter from OPI I Snow You Love Me.
I think my nails look like Fabrege Eggs, don't you?
That's all for tonight. (:
♥,
Kaseysaurusrexx


Tuesday, November 12, 2013

Mermaid Fin Watermarble inspired by Corynn Musser

Hello lovelies!
After writing three papers in one night, I figured I deserve to post on here :3

I have for you my nail art from last night. I haven't been on lately, I have three weeks left in this semester, so I've been pretty busy as you can imagine. Anyway, there is an amazing blogger and nail artist named Corynn. She is on instagram and also has a blog! She is probably the best water marbleist in the universe and she was the one who inspired me to do my first water marble at the beginning of August.

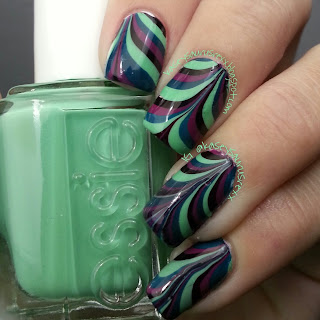
Here it is! This was my second attempt at the Mermaid Fin nails and I think they came out *alright.* But just alright. This is my right hand, and I must say, I'm only honestly happy with my ring finger and thumb (not pictured) on this hand.
I am much happier with my right hand! Excuse the nubbins on this hand, but after some practice on my left, I finally tweaked it just right for my right hand. (:
The colors I used were Essie First Timer (mint), OPI Ski Teal We Drop, Pamplona Purple, and Lincoln Park After Dark; marbled over one coat of Essie Blanc. Just add Seche Vite and that's all there is to it!

For only my third truly successful water marble, I must say I am very very very pleased with these!! (:

And here is a throwback to the first watermarble I ever did, which was only successful to countless YouTube videos and Corynn's tutorials on her blog (:


Well that is all I have for you tonight, I hope to be posting more within the next coming week as school winds down and I prepare for a few surgeries this winter.

<3,
Kaseysaurusrexx

Tuesday, November 5, 2013

Horizontal Rainbow Gradient Nail Art

Hello there!
This week has been pretty exciting - I tried a new look that I had been wanting to try for eons, and I got a ... wait for it ... CURVED WATERMARK! :D

Today I have for you a mani that I have been wanting to try since I started nail art back in May-ish.
This horizontal rainbow gradient was inspired by Darcy Sparrow (@sparrownails on IG).
This is a shot with the thumb to show the full rainbow. I absolutely adore this look! I have not yet done a skittlette mani before, so this is weird to me, having all my nails different colors.
The colors I used were Sinful Colors Ruby Ruby, Sally Hansen XTreme Wear Sun Kissed and Fuschia Power, Zoya Darcy, and Essie Shake Your $$ Maker and Bouncer, It's Me. I sponged this gradient on over Essie Blanc, and I finished off the gradient with China Glaze Fairy Dust and one coat of Seche Vite.
Here is a more normal bottle shot.

Anyway, that's all I have for tonight. Hope this inspires someone to try this as well!! (:

<3,
Kaseysaurusrexx